

Let's get started with this creative Arduino project, where you'll learn about the TFT LCD touch screen and how to use it to create your own colourful calculator. For a basic understanding of touch screen & LCD, a cheap TFT 2.4" Arduino shield is used to create this project. For creating a similar project, one should follow the steps and edit the code for better understanding.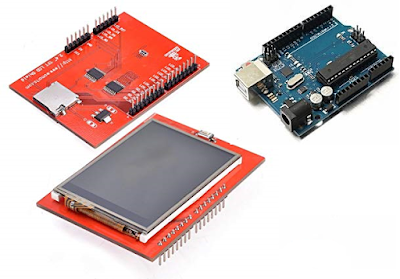
- Arduino UNO
- Arduino UNO programming Cable
- 2.4" TFT LCD Screen
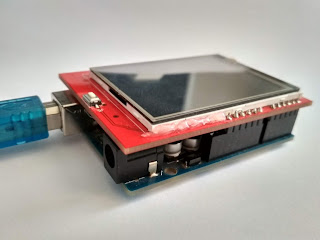
Before starting with this amazing projects let's see the working and pinout of the shield.
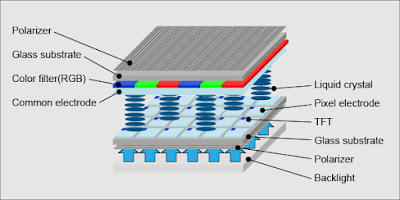
Arduino touch screen shield has three major parts:- 2.4" Thin film transistor Liquid crystal display
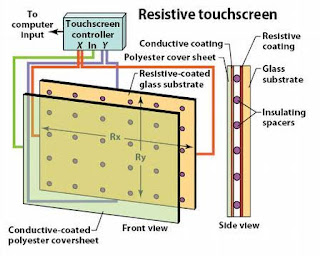
- Four-wire Resistive touchscreen
- SD card interface
|
|
Touch-screen devices using resistive technology, a two-dimensional membrane potentiometer provides x and y coordinates. The top layer is thin glass spaced close to a neighboring inner layer. The underside of the top layer has a transparent conductive coating; the surface of the layer beneath it has a transparent resistive coating. A finger or stylus deforms the glass to contact the underlying layer. Edges of the resistive layer have conductive contacts. Locating the contact point is done by applying a voltage to opposite edges, leaving the other two edges temporarily unconnected. The voltage of the top layer provides one coordinate. Disconnecting those two edges, and applying a voltage to the other two, formerly unconnected, provides the other coordinate. Alternating rapidly between pairs of edges provides frequent position updates. An analog to digital converter provides output data.
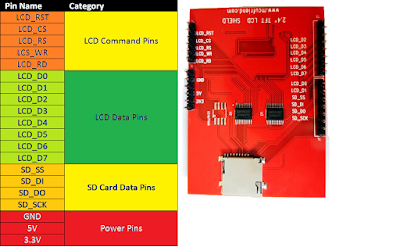
The shield connects ILI9341's data pins 0-7 to Arduino's digital pins 2-8 (allowing parallel communication, not SPI. ILI9341's RESET goes to Arduino analog pin A4. CS (chip select) to A3. RS (CD command/data) to A2. WR and RD to A1 and A0.
ILI9341 is integrated inside the display. It drives the display and has nothing to do with the touchscreen (Although the shield connects some pins of ILI9341 together with pins of the touchscreen).
first, you have to send a command to ILI9341 and then write or read data/parameters. CS pin has to be LOW during the communication, WR rising from LOW to HIGH tells ILI9341 to read byte on data pins.ILI9341 interprets input byte as a command (if RS=0) or as data/parameter (RS=1).
To read a byte from ILI9341 after sending a read command (e.g. 09h - Read Display Status) set RD from HIGH to LOW, so ILI9341 outputs data until RD returns HIGH.
Calibrating the TFT LCD Screen for Touch Screen:
To read a position of the touch, use the calibration example program after installing the required libraries for hardware from here.
We are using the SPFD5408 Library this is a modified library of Adafruit and can work seamlessly with our LCD TFT Module.
Note: It is very important for you to install this library in your Arduino IDE for this program to compile without any error.
To install this library, you can simply click on the link above which will take you to a Github page. There click on clone or download and select “Download ZIP”. A zip file will be downloaded.
Now, open Arduino IDE and select Sketch -> Include Library -> Add .ZIP library. A browser window will open navigate to the ZIP file and click “OK”. You should notice “Library added to your Libraries” on the bottom-left corner of Arduino, if successful.
we read analog values so values should be in the range 0-1023 for the 8-bit controller, but the touchscreen I tested returns 110-820(min-max).
The touchscreen I tested sometimes wrongly detects a touch, outside of the touched point. To prevent this I added some delays and the X and Y analog value is read repeatedly and touch is approved only if values do not differ a lot.
You can also find an SD card slot at the bottom of the module shown above, which can be used to load an SD card with BMP image files, and these images can be displayed on our TFT LCD screen using the Arduino Program.
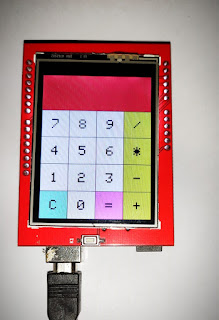
Arduino Touch Screen Calculator
TFT LCD Connections with Arduino:
The 2.4” TFT LCD screen is a perfect Arduino Shield. You can directly push the LCD screen on top of the Arduino Uno and it will perfectly match with the pins and slid in through. However, as matters of safety cover the programming terminal of your Arduino UNO with some insulator, just in case if the terminal comes in contact with your TFT LCD screen.
Assuming that you have installed the required libraries in your Arduino IDE and Setup the connections.
Let's start with the programming part
I have included three libraries in the code as shown below.
#include <SPFD5408_Adafruit_GFX.h>    // Core graphics library
#include <SPFD5408_Adafruit_TFTLCD.h> // Hardware-specific library
#include <SPFD5408_TouchScreen.h>
The calculator here is based on the simple logic that, you have to divide the screen according to touch coordinates values and write a program accordingly. Every digit or symbol visible on-screen have a defined area.
Code:
#include <SPFD5408_Adafruit_GFX.h> // Core graphics library#include <SPFD5408_Adafruit_TFTLCD.h> // Hardware-specific library
#include <SPFD5408_TouchScreen.h>
#define YP A3 // must be an analog pin, use "An" notation!
#define XM A2 // must be an analog pin, use "An" notation!
#define YM 9 // can be a digital pin
#define XP 8 // can be a digital pin
#define LCD_CS A3
#define LCD_CD A2
#define LCD_WR A1
#define LCD_RD A0
#define LCD_RESET A4
#define WHITE 0x0000 //Black->White
#define YELLOW 0x001F //Blue->Yellow
#define CYAN 0xF800 //Red->Cyan
#define PINK 0x07E0 //Green-> Pink
#define RED 0x07FF //Cyan -> Red
#define GREEN 0xF81F //Pink -> Green
#define BLUE 0xFFE0 //Yellow->Blue
#define BLACK 0xFFFF //White-> Black
#define MINPRESSURE 10
#define MAXPRESSURE 1000
/*____Calibrate TFT LCD_____*/
#define TS_MINX 850
#define TS_MINY 100
#define TS_MAXX 180
#define TS_MAXY 780
/*______End of Calibration______*/
TouchScreen ts = TouchScreen(XP, YP, XM, YM, 300); //300 is the sensitivity
Adafruit_TFTLCD tft(LCD_CS, LCD_CD, LCD_WR, LCD_RD, LCD_RESET); //Start communication with LCD
String symbol[4][4] = {
{ "7", "8", "9", "/" },
{ "4", "5", "6", "*" },
{ "1", "2", "3", "-" },
{ "C", "0", "=", "+" }
};
int X,Y;
long Num1,Num2,Number;
char action;
boolean result = false;
void setup() {
Serial.begin(9600); //Use serial monitor for debugging
tft.reset(); //Always reset at start
tft.begin(0x9341); // My LCD uses LIL9341 Interface driver IC
tft.setRotation(0); // I just roated so that the power jack faces up - optional
tft.fillScreen(WHITE);
IntroScreen();
draw_BoxNButtons();
}
void loop() {
TSPoint p = waitTouch();
X = p.y; Y = p.x;
// Serial.print(X); Serial.print(','); Serial.println(Y);// + " " + Y);
DetectButtons();
if (result==true)
CalculateResult();
DisplayResult();
delay(300);
}
TSPoint waitTouch() {
TSPoint p;
do {
p = ts.getPoint();
pinMode(XM, OUTPUT);
pinMode(YP, OUTPUT);
} while((p.z < MINPRESSURE )|| (p.z > MAXPRESSURE));
p.x = map(p.x, TS_MINX, TS_MAXX, 0, tft.width());
p.y = map(p.y, TS_MINY, TS_MAXY, 0, tft.height());;
return p;
}
void DetectButtons()
{
if (Y<50 && Y>0) //Detecting Buttons on Column 1
{
if (X>269 && X<300) //If cancel Button is pressed
{Serial.println ("Button Cancel"); Number=Num1=Num2=0; result=false;}
if (X>210 && X<260) //If Button 1 is pressed
{Serial.println ("Button 1");
if (Number==0)
Number=1;
else
Number = (Number*10) + 1; //Pressed twice
}
if (X>160 && X<205) //If Button 4 is pressed
{Serial.println ("Button 4");
if (Number==0)
Number=4;
else
Number = (Number*10) + 4; //Pressed twice
}
if (X>108 && X<156) //If Button 7 is pressed
{Serial.println ("Button 7");
if (Number==0)
Number=7;
else
Number = (Number*10) + 7; //Pressed twice
}
}
if (Y<100 && Y>55) //Detecting Buttons on Column 2
{
if (X>269 && X<300)
{Serial.println ("Button 0"); //Button 0 is Pressed
if (Number==0)
Number=0;
else
Number = (Number*10) + 0; //Pressed twice
}
if (X>214 && X<256)
{Serial.println ("Button 2");
if (Number==0)
Number=2;
else
Number = (Number*10) + 2; //Pressed twice
}
if (X>160 && X<205)
{Serial.println ("Button 5");
if (Number==0)
Number=5;
else
Number = (Number*10) + 5; //Pressed twic
}
if (X>108 && X<156)
{Serial.println ("Button 8");
if (Number==0)
Number=8;
else
Number = (Number*10) + 8; //Pressed twic
}
}
if (Y<175 && Y>115) //Detecting Buttons on Column 3
{
if (X>269 && X<300)
{Serial.println ("Button Equal");
Num2=Number;
result = true;
}
if (X>210 && X<256)
{Serial.println ("Button 3");
if (Number==0)
Number=3;
else
Number = (Number*10) + 3; //Pressed twice
}
if (X>160 && X<205)
{Serial.println ("Button 6");
if (Number==0)
Number=6;
else
Number = (Number*10) + 6; //Pressed twice
}
if (X>108 && X<156)
{Serial.println ("Button 9");
if (Number==0)
Number=9;
else
Number = (Number*10) + 9; //Pressed twice
}
}
if (Y<236 && Y>182) //Detecting Buttons on Column 3
{
Num1 = Number;
Number =0;
tft.setCursor(200, 20);
tft.setTextColor(RED);
if (X>269 && X<300)
{Serial.println ("Addition"); action = 1; tft.println('+');}
if (X>214 && X<256)
{Serial.println ("Subtraction"); action = 2; tft.println('-');}
if (X>160 && X<205)
{Serial.println ("Multiplication"); action = 3; tft.println('*');}
if (X>108 && X<156)
{Serial.println ("Devesion"); action = 4; tft.println('/');}
delay(300);
}
}
void CalculateResult()
{
if (action==1)
Number = Num1+Num2;
if (action==2)
Number = Num1-Num2;
if (action==3)
Number = Num1*Num2;
if (action==4)
Number = Num1/Num2;
}
void DisplayResult()
{
tft.fillRect(0, 0, 240, 80, CYAN); //clear result box
tft.setCursor(10, 20);
tft.setTextSize(4);
tft.setTextColor(BLACK);
tft.println(Number); //update new value
}
void IntroScreen()
{
tft.setCursor (55, 120);
tft.setTextSize (2);
tft.setTextColor(YELLOW);
tft.println("Calculator");
tft.setCursor (30, 160);
tft.println("Made By");
tft.setCursor (30, 220);
tft.setTextSize (4);
tft.setTextColor(CYAN);
tft.println("Ketan");
delay(3000);
}
void draw_BoxNButtons()
{
//Draw the Result Box
tft.fillRect(0, 0, 240, 80, CYAN);
//Draw First Column
tft.fillRect (0,260,60,60,RED);
tft.fillRect (0,200,60,60,BLACK);
tft.fillRect (0,140,60,60,BLACK);
tft.fillRect (0,80,60,60,BLACK);
//Draw Third Column
tft.fillRect (120,260,60,60,GREEN);
tft.fillRect (120,200,60,60,BLACK);
tft.fillRect (120,140,60,60,BLACK);
tft.fillRect (120,80,60,60,BLACK);
//Draw Secound & Fourth Column
for (int b=260; b>=80; b-=60)
{ tft.fillRect (180,b,60,60,BLUE);
tft.fillRect (60,b,60,60,BLACK);}
//Draw Horizontal Lines
for (int h=80; h<=320; h+=60)
tft.drawFastHLine(0, h, 240, WHITE);
//Draw Vertical Lines
for (int v=0; v<=240; v+=60)
tft.drawFastVLine(v, 80, 240, WHITE);
//Display keypad lables
for (int j=0;j<4;j++) {
for (int i=0;i<4;i++) {
tft.setCursor(22 + (60*i), 100 + (60*j));
tft.setTextSize(3);
tft.setTextColor(WHITE);
tft.println(symbol[j][i]);
}
}
}
2 comments
Kapil Kumar
@Salman,
Thanks Salman
Salman
Excellent!!